Snom PA1+ setup guide
The Snom PA1+ allows businesses to extend their existing public announcement speaker system into a SIP-based voice communication solution.
Prerequisites
Before you begin setting up the PA1+, make sure you have the following items available:
- A power source for the Snom PA1+ adapter, which is usually shipped without a power adapter. You can use any one of the following:
- Power over Ethernet (PoE) if the functionality is supported by your LAN switch
- A PoE injector
- An SNOM-approved 5V/10W power adapter (purchased separately)
- A standard headset with a 3.5 mm connector, which is the easiest way of finding the paging adapter’s IP address. during setup
Provisioning
Follow the steps in this section to complete the initial setup of the Snom PA1+ Paging Adapter:
Connect the PA1+ to your network
Wait for the device to boot up
When the SNOM device is fully booted, the Call LED will light up green and the Power LED will be red.
Find the device’s IP address
Start by plugging your headset into the Line Out jack.
Then, press the IP/Reset button. The device will read out its IP address through the headset.
Access the web interface
Use a computer connected to the same network as the SNOM to open a web browser and enter the device’s IP address.
Log into the web interface. By default, the credentials are typically admin / admin.
Configure provisioning
When you’ve logged into the web interface, you can provision the SNOM by following these instructions:
- Go to the Advanced Settings > Update tab.
- In the Setting URL field, enter the following provisioning URL: https://prs.ooma.com/{mac}.xml
- Save your changes and reboot the device.
Connect Your Paging System
There are two speaker output options based on your speaker impedance. Choose the one option below that best represents your system. Refer to the SNOM PA1+ user manual for wiring diagrams.
For 4–32 Ohm Speaker (Low Impedance)
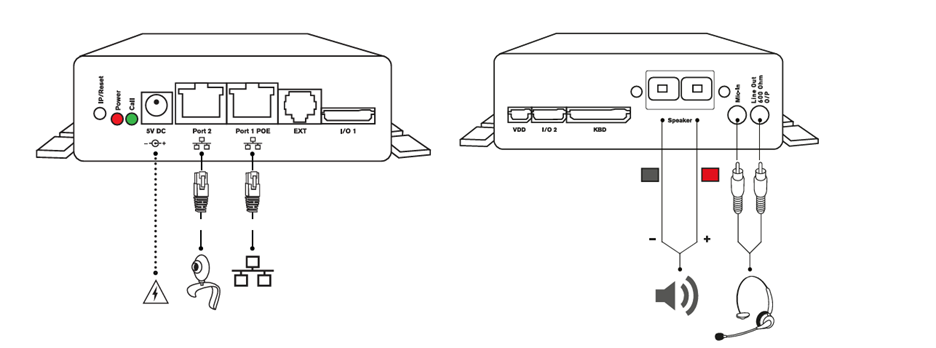
- Connect the loudspeaker wires to the Speaker terminals:
- Red terminal is +
- Black terminal is –
- Optionally, use the Mic-In and Line-Out jacks for headset-based setup or for integration with other audio devices.
For 600 Ohm Speaker (High Impedance / Line-Level)

- Use the included 3-pin screw terminal or a 3.5 mm jack adapter to connect the speaker via the Line Out (600 Ohm O/P) jack.
- If you need to integrate external triggers like door control or sensors, use the I/O1 port.
Add the Device to Your Ooma Office Account
You will need to connect the SNOM device to your Ooma Office account to complete its registration:
- Log in to your Ooma Office account as an admin user and navigate to Devices under the Settings menu.
- Use the Add menu to select IP Phone.
- Choose Snom PA1+ from the list.
- Follow the on-screen steps to add the device’s MAC address and assign the device to a user.
Confirm that the SNOM PA1+ is Ready
Once the Snom PA1+ has been successfully provisioned and connected to your speaker system, you can check that it’s ready by confirming the following:
- The Call LED will be solid green, indicating the device is ready to receive calls.
- The Power LED (red) should turn off after boot-up. If it remains lit, the device may still be booting or undergoing a firmware update.
If the Call LED is not green, double-check the network connection and provisioning settings.
Make a Test Page
Use any other extension in your phone system to dial the Ooma Office extension assigned to the PA1+ device.
The PA1+ should automatically answer and broadcast the caller’s voice through the connected speaker.
