How to set up Microsoft Dynamics 365 for integration with Ooma Office (Pro Plus)
Once you have enabled Microsoft Dynamics 365 CRM integration in Ooma Office![]() , your CRM needs to be configured for integration with Ooma Office.
, your CRM needs to be configured for integration with Ooma Office.
First steps
Before you can integrate Microsoft Dynamics 365 with Ooma, you’ll need to make sure that you have done the following:
- Enable your Ooma account for CRM by following the steps outlined in this article
- Enable CRM integration for individual users by following the steps in this article
- Check to make sure you have administrator privileges to configure integration inside Microsoft Dynamics 365
Add Channel Integration 1.0 Framework
You’ll begin by adding the Channel Integration 1.0 Framework to your Microsoft Dynamics 365 instance.
Make sure that you’re logged in as an administrator, then install Channel Integration Framework 1.0 directly from Microsoft AppSource. Use the Get It Now option and then follow the steps in the setup wizard.
Add Ooma Office as a channel provider
Once you have installed the Channel Integration Framework, your next step is to add Ooma Office as a channel provider. You can do this by following these instructions:
- Open Microsoft Dynamics 365.
- In the title bar to the right of the Dynamics 365 icon, select the name of application currently in view and then select Channel Integration Framework.
- Use the New + option to open a new screen where you can enter the Ooma Office integration details. Note that the New + option may not appear immediately. If you don’t see it, please wait a few minutes and then refresh your view to try again.
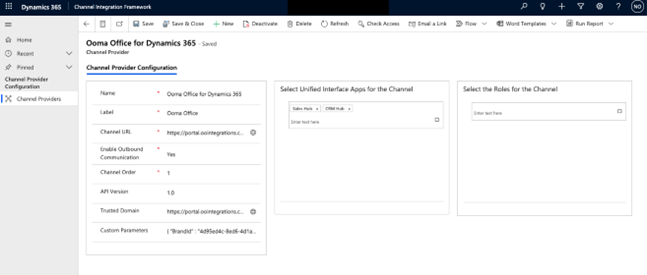
- Fill in the Channel Provider Configuration details, using the following parameters for guidance:
- Name: Ooma Office for Dynamics 365
- Label: Ooma Office
- Channel URL: https://portal.oointegrations.com/dynamics/index.html
- Enable Outbound Communications: Yes
- Channel Order: 1
- API Version: 1.0
- Trusted Domain: https://portal.oointegrations.com
- Custom Parameters: { “BrandId” : “4d95ed4c-8ed6-4d1a-58c2-08d98a744d1b” }
- On the same page, you will use the Select United Interface Apps for the Channel section to choose which United Interface Apps will integrate with Ooma Office:
- Choose All for the Ooma Office client to be globally available
- Choose specific apps if you’d like to limit the availability of the Ooma Office client Note that if you do not select any apps, the Ooma Office client won’t be visible to anyone.
- On the same page, you can use the Select the Roles for the Channel section to choose which user roles will be able to use the Ooma Office client. If you’d like Ooma Office client to be available to everyone, leave this section blank.
- The final Channel Provider Configuration window should look similar to this:
 When you have confirmed your configuration, Save your changes and close the window.
The setup process to configure the Ooma Office plugin within your Microsoft Dynamics 365 instance is now complete. The plugin should appear on the right side of the selected apps. Users don’t need to install anything; all they need to do is log in to Ooma Office with their Ooma login credentials.