Faxing with Ooma
With the proper equipment, it is possible to send and receive faxes. There are several configuration options, allowing you to select the setup that will be best for you. Before you begin, please keep in mind that you will need to have access to a working fax machine, and possibly a phone splitter in order to use this feature. Once you have all of the necessary tools, check out the guides below for your desired configuration.
- Using your phone and fax machine on the same line
- Using your fax machine on a dedicated line
- How to send a fax
- How to receive a fax
- I followed the directions but my faxes still aren’t working. What can I do?
- Background Information: Voice over IP (VoIP) and Fax Machines
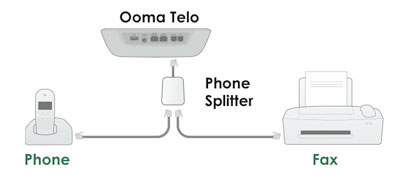
Using your phone and fax machine on the same line
To use your home phone and fax machine on the same line, you’ll connect both devices to the PHONE port on the back of your Ooma device. This setup is great if you don’t use your fax machine often, or if you usually send faxes, but don’t receive them. To get started, you will need the following equipment:
- A standard phone splitter
- Your fax machine
- Two phone cords
Plug the phone splitter into the PHONE port of your Ooma device. Connect one of your phone cords to your telephone, and the other to your fax machine’s phone input as shown in the image below:
If you don’t want your calls to be picked up by the fax machine, you should turn the auto-answer mode on your fax machine off by putting it in “manual” mode. If you prefer to leave auto-answer on, you may want to set your machine up to have a long delay before pick up in order for you to answer your voice calls. You may need to refer to your fax machine’s user manual for more information on how to do this.
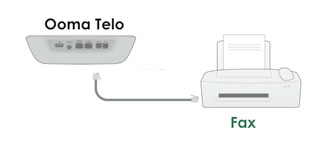
Using your fax machine on a dedicated line
If you’re a power user who does a lot of faxing, you’ll want to set up a dedicated line for your fax machine. This means that you’ll need the following equipment to set up your machine:
- Your fax machine
- One phone cord
- One or more Ooma HD3 Handsets or Ooma HD2 Handsets to use as your phones in your home
The PHONE port on the back of the Ooma Telo Base Station or Phone Genie will be dedicated to your fax machine, so your existing home phones can’t be used. You’ll also need a subscription to Ooma Premier since you’ll need to have two lines - one for voice and one for fax.
To get started, use the phone cord to connect the PHONE port of your Ooma device to your fax machine’s phone input as shown in the image below.
Next, you are going to set up your Ooma Telo Base Station to be on a dedicated line, separate from your Ooma HD3 Handsets or Ooma HD2 Handsets. You can do this by following these instructions:
- Log into your My Ooma account and navigate to Devices under the Preferences tab
- Click on “+Add Private Account”
- Fill out all of the information in the “Create Private Account” screen and save your changes
- Click on the
 icon beneath the Ooma Telo Base Station or Phone Genie, and then select “Move to [new] account”.
Next, you’ll need to select a second phone number. This will be the number that is dedicated to your fax machine. Again, please keep in mind that you will need to have an Ooma Premier subscription in order to have two phone numbers. You can choose a second phone number by following the instructions in the personal phone number FAQ.
How to send a fax
Ooma needs to know that you are making a fax call so the connection can be optimized for fax transmissions. Dial the prefix *99 before dialing the number you wish to reach. When you are ready to send a fax, follow the instructions for your particular fax machine.
How to receive a fax
If you’ve set up your fax machine on a dedicated line
You’re ready to receive faxes at all times!
If you have your phone and fax machine set up on the same line
You’ll need to configure your fax machine to auto-answer the next call. Once you’re done receiving your fax, turn off auto-answer on your fax machine to avoid having your fax machine pick up all incoming calls.
I followed the directions but my faxes still aren’t working. What can I do?
Faxing over Ooma is highly dependent on the quality of your Internet connection. Faxing technology was developed to work over regular phone lines, which do not experience the same amount of delay and data loss that Internet networks do today. Although it is already possible to send and receive faxes with Ooma, we’re always looking into new ways to improve the reliability with faxing with the Ooma system. In the mean time, ensuring that your setup is configured in the optimal way is your surest way of successfully sending and receiving faxes. If you are having difficulties sending or receiving faxes, please try the following troubleshooting steps:
- Ensure that your Ooma device is hooked up directly to your modem, ahead of your router (Setup Option A in your Quick Start Guide)
- Disable “ECM” (i.e., “Error Correction Mode”) on your fax machine
- Decrease the transmission or baud rate
- Reduce the number of pages that are sent per fax
- Decrease the desired image quality of the fax
- Discontinue any large file downloads (for receiving faxes) or uploads (for sending faxes)
Background Information: Voice over IP (VoIP) and Fax Machines
A common question comes up - why are faxes not guaranteed reliable 100% of the time when using VoIP technology? The reason has to do with how faxing was originally developed. The faxing protocol was originally developed for regular landlines. Unlike IP networks which route VoIP, landlines are fairly lossless. This makes faxes less resilient to dropped packets and delay inherently present in all IP networks today. Ooma is currently looking into new ways to improve the reliability of faxing with the Ooma system, including use of the T.38 FoIP protocol.
Note: If you find a need for reliable faxing, we recommend that you keep a Landline for this purpose.