Smoke Alarm installation and pairing instructions
You will find the following items included with the Ooma Smoke Alarm:
- Ooma Smoke Alarm with mounting plate
- Mounting screws and drywall anchors
- Quick Start Guide
Powering on the Smoke Alarm
The first time you set up your Smoke Alarm, you will need to power it on:
- Remove the mounting plate from the Smoke Alarm by twisting it counterclockwise.
- Use something narrow like a pencil or a paperclip to press the PAIRING button.
- You will hear three loud beeps and will see the status indicator light blink red when the Smoke Alarm powers on.
- Your Smoke Alarm is ready to detect smoke when the status indicator light stops blinking.
Pairing the Smoke Alarm
Once the Smoke Alarm has been powered on, you must pair it with your Telo Base Station:
- Bring the Smoke Alarm within ten feet of the Telo Base Station.
- Use the mobile app to press the “Add Sensor” button on the dashboard.
- Select “Smoke Alarm” as the type of sensor you would like to pair.
- Use something narrow like a pencil or a paperclip to press the PAIRING button and initiate pairing mode.
- Follow the on-screen instructions to complete the pairing process.
- Your Smoke Alarm’s status indicator light will pulse in green for three seconds if pairing is successful.
Placement recommendations for the Smoke Alarm
The NFPA recommends installing a smoke alarm in the following areas within your home:
- A minimum of one smoke alarm on every floor, including finished attics and basements.
- A smoke alarm inside and outside every sleeping area.
- A smoke alarm at the top of the stairs between the first and second floors.
- A smoke alarm on the basement ceiling near the stairs.
- Additional smoke alarms may be required in a home with over 1,000 square feet per level.
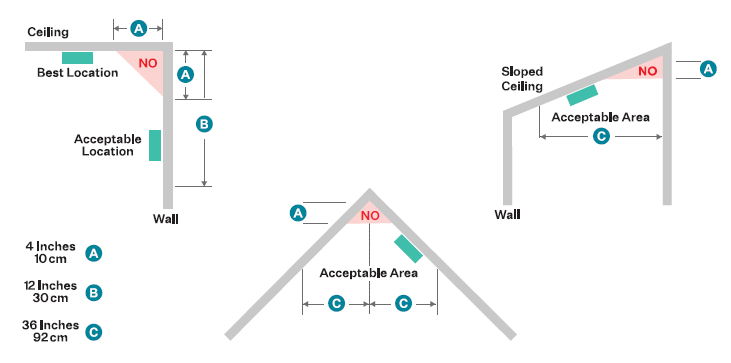
Each smoke alarm should be mounted on either the ceiling or the wall. We recommend that you install the Smoke Alarm on the ceiling whenever possible. If you have a sloped or cathedral ceiling, the Smoke Alarm should be installed between 4” and 3’ from the highest point:
Screw and drywall anchor installation
To install the Smoke Alarm in drywall, begin by using the back cover as a stencil to mark the drill holes. Drill the holes to fit the drywall anchors. Push the drywall anchors into the holes and then screw the mounting plate into place. Press the Smoke Alarm to the mounting plate and turn it clockwise to secure it.
Screw installation
To screw the sensor into a non-drywall surface, screw the mounting plate directly into the wall in the desired location. Press the Smoke Alarm to the mounting plate and turn it clockwise to secure it.
