Garage Door Sensor installation instructions
You will find the following items included with the VTech Garage Door Sensor:
- VTech Garage Door Sensor
- Double-sided mounting tape
- Mounting screws
- Two AAA batteries
- User manual
Your first step in installing the sensor is to install the two AAA batteries. Press the latch button on the sensor to open the battery compartment case, and then insert the batteries into the compartment.
Next, you will need to pair the sensor with your Telo Base Station. You can pair it by following these instructions:
- Bring the sensor within ten feet of the Telo Base Station.
- Use the mobile app to press the “Add Sensor” button on the dashboard.
- Select the type of sensor you would like to pair.
- Follow the instructions on the screen to complete the pairing process.
Once the sensor is paired, you will need to decide where on the garage door you would like to install it. The Garage Door Sensor is designed to be battery-operated so that it can be installed anywhere. The sensor is not weatherproof, so it should be mounted indoors in a dry location.
The wireless signal between the Garage Door Sensor and the Telo Base Station can be blocked by metals, so avoid mounting it directly onto a metal surface. You may wish to test the strength of the sensor’s connection to the Telo Base Station by standing near the garage door and tilting the sensor 90 degrees so the vtech logo is facing downward:

Note that there is a component inside the sensor that detects orientation. It is normal to hear a rattling sound when the sensor is tilted.
Once you have confirmed that the sensor is within range of the Telo Base Station and you have decided on a mounting location, there are two different installation methods for the VTech Garage Door Sensor.
Adhesive tape installation
This installation method is ideal for smooth surfaces. A textured surface can keep the mounting tape from making a strong bond.
To install the Garage Door Sensor with the included adhesive tape, start by wiping the surface with a damp cloth to clean it. Dry the surface, and then peel the double-sided tape. Press one side of the tape to the rectangular area of the sensor’s back cover, and then press the sensor against the garage door and hold it in place for 30 seconds:
Screw installation
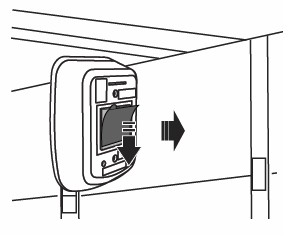
To mount the sensor using screws, press the latch button on the sensor to open the battery compartment case:

Use the two holes on the back of the cover to mark the desired location on the garage door. Then, remove the back cover and drill two holes into the garage door. Align the holes on the back cover of the sensor with the holes on the garage door and screw the back cover onto the door:
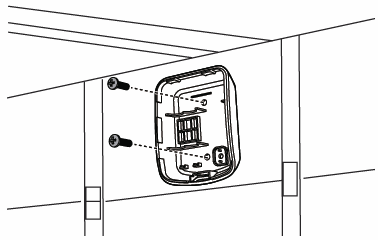
Tighten the screws into the holes to secure the back cover to the garage door. Then push the battery compartment case back onto the back cover until it clicks into place.
