Ooma Door and Window Sensor
The Ooma Door and Window Sensor works with Ooma Smart Security to alert you when your doors or windows are opened unexpectedly. This sensor can be installed anywhere that an intruder may use to gain access to your home, including front, back, and garage doors, and any window. The sensor can also detect if a door or window has been left open for an extended period and can alert you if it needs to be closed.
- What comes in the box?
- Installation Instructions
- Can I mount the Door and Window Sensor outdoors?
- Are there any places I should avoid mounting the Door and Window Sensor?
- What is the Door and Window Sensor’s battery life?
- Can the Door and Window Sensor be plugged in?
- What do the lights on the Door and Window Sensor mean?
- What options can I enable for the Door and Window Sensor?
- Is there a video that can tell me more about the Ooma Door and Window Sensor?
- My Ooma Door and Window Sensor is disconnected. What should I do?
What comes in the box?
You will find the following items included with the Ooma Door and Window Sensor:
- Ooma Door and Window Sensor
- Adhesive pads
- Mounting screws
- Two AAA batteries
- Additional risers
- Quick Start Guide
Installation Instructions
The first time you set up the Ooma Door and Window Sensor, you will need to pair it with your Telo Base Station. You can pair the sensor by following these instructions:
- Bring the sensor within ten feet of the Telo Base Station.
- Use the mobile app to press the “Add Sensor” button on the dashboard.
- Select the type of sensor you would like to pair.
- Follow the instructions on the screen to complete the pairing process.
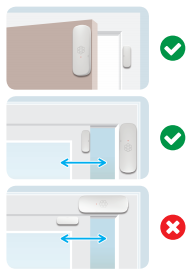
Once the sensor is paired, make sure that the tamper sensor is pressed down and decide where you would like to install it. When you are deciding on a mounting location, make sure that the pieces will be mounted such that they separate either vertically or horizontally when the door or window opens. If they separate laterally, the sensor may not function properly:
Once you have decided on a mounting location, there are two different installation methods for the Ooma Door and Window Sensor.
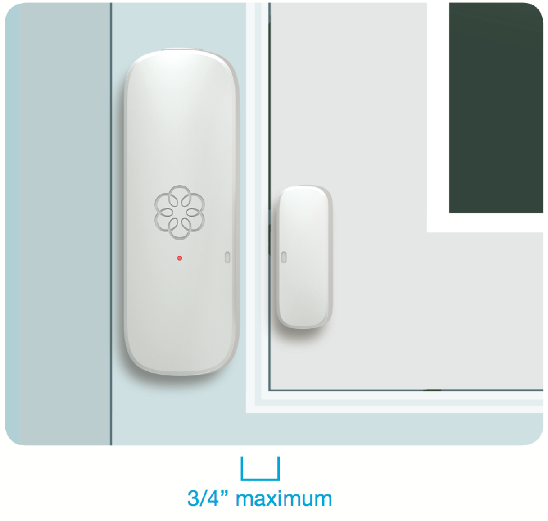
The two pieces of the sensor should be mounted so that when the door or window is closed the indented dots on the front of each sensor are no more than 3/4 inch apart, and so that the front of both pieces of the sensor are as even as possible:
If necessary, you can attach additional risers (included) to raise the height of the magnet tab. You can choose the appropriate installation process for each of the two pieces of the sensor.
Adhesive tape installation
To install the Door and Window Sensor on a wall with the included adhesive tape, start by wiping the surfaces with a damp cloth to clean them. Dry the surfaces, and then peel the adhesive tape. Press one side of the tape to the sensor, and then press the sensor against the mounting surface and hold it in place for 30 seconds.
Screw installation
To mount the base of the sensor using screws, screw the mounting plate into the desired location. Reattach the sensor to the mounting plate.
Can I mount the Door and Window Sensor outdoors?
The sensor is not weatherproof, so it should be mounted indoors in a dry location.
Are there any places I should avoid mounting the Door and Window Sensor?
The wireless signal between the Door and Window Sensor and the Telo Base Station can be blocked by metals, so avoid mounting it directly onto a metal surface.
What is the Door and Window Sensor’s battery life?
The Door and Window Sensor has a battery life of approximately 1.5 years.
You will receive a notification immediately when the sensor has low battery. In addition, you will receive notifications via the app every Wednesday and Saturday until the battery is replaced.
Can the Door and Window Sensor be plugged in?
The Door and Window Sensor is designed to be battery-operated so that it can be installed anywhere.
What do the lights on the Door and Window Sensor mean?
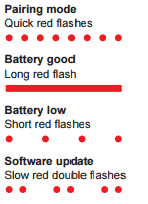
The Door and Window Sensor uses an LED light to indicate its status. Please see the chart below for more information about what each indicator type means:
What options can I enable for the Door and Window Sensor?
You can use the Ooma Smart Security mobile app to determine when the Door and Window Sensor is enabled and when it is not. The app can also be configured to alert you when the sensor has not been activated within a certain time frame. This can be useful if you are expecting someone to return home at a certain time each day.
You can learn more about configuring the mobile app by visiting our FAQ.
Is there a video that can tell me more about the Ooma Door and Window Sensor?
Yes! You can watch our tutorial video to learn more about the Ooma Door and Window Sensor.
My Ooma Door and Window Sensor is disconnected. What should I do?
If your Door and Window Sensor is not connected, try the following troubleshooting steps:
- Check if the placement of your sensor is good. Your sensor must be within 200 feet of your Telo Base Station to maintain a good connection. Avoid mounting your sensor near metal objects, which can obstruct the signal between the sensor and your Telo Base Station.
- Check whether your battery is still good:
- Quickly tap the sensor’s pairing button. If the LED status indicator shows a solid, steady light for five seconds, your battery is good. If it blinks for five seconds or does not light up at all, your batteries should be replaced.
- If you had to replace your batteries, tap the pairing button to page your Telo Base Station. This should cause your sensor to reconnect.
- If the above steps did not resolve the problem, try re-pairing your sensor by pressing “+ Add Sensor” on the Ooma Smart Security mobile app dashboard and choosing the type of sensor you want to re-pair. Follow the on-screen instructions.
- If the above steps did not solve your issue, contact our Customer Care team.
