Custom Ring Tones
A popular cell phone feature is the ability to create custom ring tones and to set them as the default ring. That popular feature is now available for all Ooma customers who have an HD2 or HD3 Handset. Custom ring tones can be uploaded directly to the Ooma Telo Base Station or Phone Genie, and can be used just like a standard ring tone to personalize your device.
- What are custom ring tones?
- Who can use custom ring tones?
- What type of file is used to create a ring tone?
- How do I upload a custom ring tone for my Ooma HD2 Handset?
- How do I create a music file of the appropriate size and type?
- How can I make a clip of an audio file?
- How do I use a custom ring tone that I have uploaded to my Telo Base Station or Phone Genie?
- How many ring tones can I upload?
What are custom ring tones?
Custom ring tones are personalized audio files that are uploaded to the Ooma Telo Base Station or Phone Genie and are then available for use as ring tones on the Ooma HD2 Handset or the Ooma HD3 Handset. Many users enjoy uploading their favorite songs so that they can personalize their phone’s ring tone.
Who can use custom ring tones?
Anyone with an Ooma Telo Base Station or Phone Genie and an Ooma HD3 Handset can upload and assign a custom ring tone.
What type of file is used to create a ring tone?
At this time, the Ooma Telo Base Station or Phone Genie can only accept files that are 16-bit, mono, 16 kHz sampling rate saved as a WAV format.
How do I upload a custom ring tone for my Ooma HD2 Handset?
To upload a custom ring tone to your Ooma Telo Base Station or Phone Genie, you will need to do the following:
- Decide which audio file you would like to use as a custom ring tone and use the audio program of your choice to convert it to a 16-bit, mono, 16 kHz sampling rate WAV format. If you have never used an audio program before, we recommend that you use the free Audacity program and follow the instructions that are outlined in the next question of this FAQ. NOTE: When you download the Audacity program you do not need to include any of the optional elements. The basic program is sufficient for editing the file.
- Connect a computer to your Ooma Telo Base Station by following the instructions in this FAQ that describes the process.
-
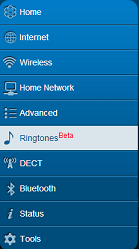
When you are connected to the Telo Base Station, click on the Ringtones tab, as shown below:
- Choose the file that you would like and then click upload. The ring tone will be loaded onto your Telo Base Station or Phone Genie and synced to your HD2 or HD3 Handset.
How do I create a music file of the appropriate size and type?
If you have never converted an audio file before, the process is relatively simple using a free program called Audacity. You can download the program by visiting this site. Once you have installed the program, just follow these steps:
On a Mac
- Go to the Audacity menu and select Preferences…
- Under the File Formats tab, set the Uncompressed export Format to WAV (Microsoft 16 bit PCM). Close the Preferences menu.
- Go to the File menu and select Open to import the audio file that you would like to convert.
-
On the left of the screen next to the song’s audio track, you may see the word Stereo beneath a dropdown menu:
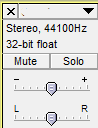
Click on the dropdown menu and select “Split Stereo To Mono”. The track will split into two. Delete the bottom one by clicking on its top left X mark.
-
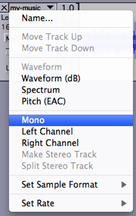
On the remaining track, click on the dropdown menu and select “Mono”:
-
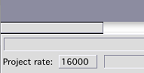
On the bottom of the screen, you will find a dropdown menu where you can set the Project Rate (Hz). Set this number to 16000:
- Click on the File menu and select Export as WAV to create your audio file. It is now ready to upload to your Ooma Telo Base Station or Phone Genie.
On a Windows Computer
- Go to the Edit menu and select Preferences…
-
Under the Quality tab, set Default Sample Rate to 16000 Hz. Set the Default Sampling Format to 16-bit:

-
On the bottom of the screen, you will find a dropdown menu where you can set the Project Rate (Hz). Set this number to 16000:
- Use the File menu to import the audio file that you would like to convert.
-
On the left of the screen next to the song’s audio track, you may see the word Stereo beneath a dropdown menu:
Click on the dropdown menu and select “Split Stereo To Mono.” The track will split into two. Highlight and delete the bottom one.
- On the remaining track, click on the dropdown menu and select “Mono”.
- Click on the File menu and export your audio file. When you are asked to save the file, make sure that the type is “WAV (Microsoft) signed 16 bit PCM”. It is now ready to upload to your Ooma Telo Base Station or Phone Genie.
How can I make a clip of an audio file?
You can create a shorter version of your audio track by following these instructions in Audacity:
On a Mac
- Click on the selection tool (
 ) in the toolbar.
 - Click and drag over the selection you want to keep. That area will turn darker than the remaining clip.
- Make any changes you want to the selection by clicking and dragging the edges of the track in the appropriate direction.
- On the menu click on Edit/Copy, then click on File/New, then click on Edit/Paste.
- You may click on the magnifier with minus sign icon (
 ) to zoom out.
 - Perform the remaining steps to convert the file into the appropriate format and transfer it to your Ooma Telo Base Station or Phone Genie.
On a Windows computer:
- Click on the selection tool ( ) in the toolbar.
- Click and drag over the selection you want to keep. That area will turn darker than the remaining clip.
- Make any changes you want to the selection by holding down SHIFT and dragging the edges of the track in the appropriate direction.
- Click on the Edit menu and select Clip Boundaries, then Split New.
- Your selection will be turned into a new track beneath the original. Perform the remaining steps to convert the file into the appropriate format and transfer it to your Ooma Telo Base Station or Phone Genie.
How do I use a custom ring tone that I have uploaded to my Telo Base Station or Phone Genie?
Once your ring tone is uploaded to your Ooma Telo Base Station or Phone Genie, you will be able to access it on your Ooma HD2 Handset or Ooma HD3 Handset. You can navigate to your new ring tone by pressing the Menu key on your Handset and then going to Settings, then Ring pattern, then External ring or Internal ring, then User defined ring tone.
Once you have located your custom ring tone, you can set it as the default ring tone for your HD2 or HD3 Handset. To do this, highlight the ring tone and press the “Select” key.
How many ring tones can I upload?
Your Ooma Telo Base Station or Phone Genie has up to 20 MB of internal storage allocated for custom ring tones. Individual ring tone files cannot be larger than 5 MB, so you can upload a minimum of four ring tones.